Intro

1. The Evothings node-red front-end parser works a little differently than the usual node-red run-time.
2. It's not really clear where to go next when you've downloaded and started the node-red version of Evothings Studio.
But why?
Yes, why would you anyway? My hope is that many people would welcome an even easier route to getting started doing IoT apps. Evothings studio is the quickest route that I know of at the moment, given that you don't mind doing cross-platform JavaScript development and baking your app with cordova at the end.
Still, Evothings Studio is all about JavaScript, and if it's not your first programming language, there can be a lot of sharp corners to cut yourself on.
By packaging access to some of the Cordova and JavaScript BLE APIs as visually composable modules (in the node-red editor), I hope that it becomes even easier to create and experiment with apps the communicate with sensors or other Bluetooth devices.

Prerequisites
1. Download the Node-red branch build of Evothings Studio here;
Windows: https://s3-eu-west-1.amazonaws.com/evothings-download/EvothingsStudio_Win_32_2.0.0beta2-node-red.zip
OSX: https://s3-eu-west-1.amazonaws.com/evothings-download/EvothingsStudio_Mac_64_2.0.0beta2-node-red.zip
Linux (Yay): https://s3-eu-west-1.amazonaws.com/evothings-download/EvothingsStudio_Linux_64_2.0.0beta2-node-red.zip
2. Unpack it in your home directory (*NOT* under C:\program files or the like, if you're running Windows)
3. Make sure it runs, and looks reasonably like this:

What you're running now is essentially the latest beta of Evothings Studio 2.0, but with a couple of modifications, so everything you'd like to do with the original studio (and it's quite a lot), you can do here as well. The modifications cooks down to a new button for each of the projects under 'My Apps' (any front-end project, really, that can be anywhere on your machine) that let you launch a node-red editor and create+edit a flows.json file in the directory where the index.html of your project resides.
4. Go to the Examples tab, and note the two projects 'Hello Node-Red World' and 'Node-Red Front-End TI Sensortag'.

The two examples are the only ones that you can actually use directly, if you want to see how the node-red editor works together with the studio to push out incremental changes to your mobile.
5. Speaking of which, it's time to install the viewer on your phone. Here's the link for iOS and Android, and make sure it runs and looks like the image below;

6. To connect your phone and the studio, you generate a one-time key in the studio and enter it on the phone.


7. Now, you should have one client connected at the lower right status field of the studio. You re now ready to rock! If you want to avoid entering a new code every time you have crappy connectivity, you can log in (using github, google or plain email) to the proxy to make it preserve the session.

8. Now copy the example project 'Hello Node-Red World' from the examples tab and by clicking the 'COPY' button next to it. When you are done, you're taken to the 'My Apps' tab where the new project will show up.

By clicking 'CODE' the studio open a system file browser that shows the root of the directory, to let you edit the files using your favorite editor. These files are a bit doctored to load and parse node-red flows.json files and to populate the mobile web page with the widgets that are defined there. You can of course edit the index.html and everything as you wish, and do both classical and node-red development at the same time (as long as you don't bork the node-red front-end stuff).
9. Click the 'RUN' button to push out your project to your mobile phone. It will (hopefully) like a bit like below when it lands;

Not a beauty, by any means, but does contain a bare-bones examples of what a simple node-red front-end app could look like.
If you have any Bluetooth devices around, you can click 'SCAN' which lists all found (until you press the button (now saying 'STOP SCAN') again). Clicking on one of the found devices will list its services in a separate list.

OK, not very impressive.- Seen it before - yawn, right? But what I want to highlight here is not actually the functionality of the app but how it was made.
10. If you go back to the 'My Apps' tab on the studio, now click the 'NODE-RED' button, which should bring up the visual node-red flows editor for the current project.

All node-red front-end apps must begin with a 'Page' module, which has connections to all other visible widgets under it, normally organized by 'Section' modules. Visible stuff like sections, buttons and so on are connected to each another sort of like a DOM tree, but after that, the connections between modules actually defines message-passing.
For example, the 'Scan' module is actually a Button module, which has been renamed to Scan. it will implement a Material Design Lite Button and when it is clicked, a message will be passed to whatever other module(s) it is connected to.
This button connect to two other modules - a function and a module called 'blescan'. Let's look at the function;

All modules (including functions) gets passed one argument object called 'msg'. The convention is to have a property of msg called 'payload' which contain the important parts.
The payload passed by a button is the DOM event object of the click, which is then used to determine which new text caption the button should be set to. So buttons also can receive messages, and will change caption to that of the payload.
But the interesting thing with functions is that you can add them anywhere and use them to debug messages being passed. And now we come to a very nice thing with Evothings Studio itself - that you gets logs back from the running app on the phone, continually.
11. Click on the blue button named 'Tools' in the main Studio app window. you now get a new window with two parts - a small editor at the top (already populated with examples to try out) and at the bottom an area which display the logs from your app.
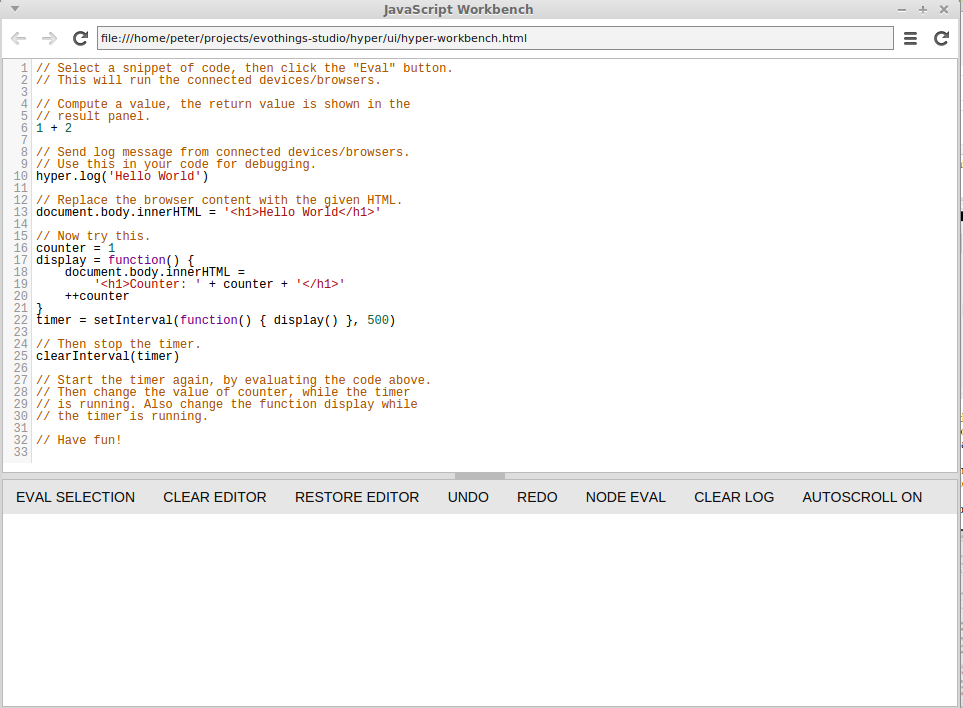
So if we add a log statement to the function, like this;

It will result it some logs in the Tools window when the button is pressed.

And, it turns out, quite a lot of my own silly happy-go-lucky developer logging while I'm making the nrfe-widgets. I should probably clean those up a bit. :) But what I wanted to show here is ..
1. You can develop apps visually in the node-red editor and still get quite a lot of functionality.
2. The widgets will look sort of OK without *any* efforts at styling.
3. The program that scan for BLE devices and then list the services of a selected one contained only three lines of code, over two functions (the other picked a property of the incoming message and sent it as output).
4. Three lines of code that you write yourself, for a bespoke app, is a sweet small number to maintain.
The modules have documentation included in themselves, so when you select a module in the node-red editor, the documentation comes up in a sidebar to the right. This is a very nice way of doing things from the creators of node-red, and helps a lot when just getting started. I haven't documented very well, but I hope that it is enough to get started.
Again, please let me know what you'd like to see next and if you've managed to make anything yourselves using the editor!
Over and out, for now.

Comments